I've found the 'sugi ban' process allows gives you the base to then add a paint finish that will
get close to the Driftwood look.
The driftwood look.
-
gesso

- Posts: 572
- Joined: Mon 03 Dec, 2007 10:01 am
- Location: GL544DX
- Organisation: The Gilders Studio
- Interests: see above
Re: The driftwood look.
- Attachments
-
- ab7e9407e207276a4e0b87add30a109cweb.png (94.96 KiB) Viewed 7216 times
-
- 61790d670c85d0c4cf9b70d2d9f41c77.png (46.93 KiB) Viewed 7216 times
-
- 43a4a958c567c80fde330097cb6e2ae7.png (34.16 KiB) Viewed 7216 times
-
- 3f3c0b6bdd8b364a30ffefc937f8d664.png (79.41 KiB) Viewed 7216 times


-
raymond
- Posts: 47
- Joined: Thu 18 Dec, 2014 10:48 am
- Location: Cornwall
- Organisation: raymond bradshaw photography
- Interests: photography . Walking . travel .
- Contact:
Re: The driftwood look.
Forgive my ignorance, but what the hell is the sugi ban process ??????? What ever it is the effect looks fantastic.gesso wrote:I've found the 'sugi ban' process allows gives you the base to then add a paint finish that will
get close to the Driftwood look.
-
raymond
- Posts: 47
- Joined: Thu 18 Dec, 2014 10:48 am
- Location: Cornwall
- Organisation: raymond bradshaw photography
- Interests: photography . Walking . travel .
- Contact:
Re: The driftwood look.
gesso wrote:I've found the 'sugi ban' process allows gives you the base to then add a paint finish that will
get close to the Driftwood look.
I Just goggled sugi ban, and found this you tub link. Some one ells on this thread mentioned trying this. Thank you. https://www.google.co.uk/search?biw=225 ... Lf4NAanquE
-
raymond
- Posts: 47
- Joined: Thu 18 Dec, 2014 10:48 am
- Location: Cornwall
- Organisation: raymond bradshaw photography
- Interests: photography . Walking . travel .
- Contact:
Re: The driftwood look.
Looks authentic Mark, what does it make your beer taste like though.prospero wrote:
-
AllFramed

- Posts: 282
- Joined: Tue 17 Aug, 2010 1:20 pm
- Location: In Hampshire in the New Forest
- Organisation: AllFramed
- Interests: Framing, Photography, The Clarets, Chateau Musar
Re: The driftwood look.
How interesting. I have a propane torch for use as a weed killer (works well and is strangely therapeutic)
Will have to give this a try after the hols and see what I can do.
http://shousugiban.com/shou-sugi-ban-101/
And a video too. A bit messy but no more onerous than many other hand finishes.
http://shousugiban.com/zen-meditation-o ... an-boards/
Will have to give this a try after the hols and see what I can do.
http://shousugiban.com/shou-sugi-ban-101/
And a video too. A bit messy but no more onerous than many other hand finishes.
http://shousugiban.com/zen-meditation-o ... an-boards/
There's more to the picture, than meets the eye. Hey hey, my my.
-
Not your average framer
- Posts: 11018
- Joined: Sat 25 Mar, 2006 8:40 pm
- Location: Devon, U.K.
- Organisation: The Dartmoor Gallery
- Interests: Lost causes, saving and restoring old things, learning something every day
- Location: Glorious Devon
Re: The driftwood look.
This stuff is really interesting. I had no idea that people did this sort of thing!
Here's a variation on the same sort of thing which I have just found.
https://www.youtube.com/watch?v=6xoBjpXOlyM
Here's a variation on the same sort of thing which I have just found.
https://www.youtube.com/watch?v=6xoBjpXOlyM
Mark Lacey
“Life is short. Art long. Opportunity is fleeting. Experience treacherous. Judgement difficult.”
― Geoffrey Chaucer
“Life is short. Art long. Opportunity is fleeting. Experience treacherous. Judgement difficult.”
― Geoffrey Chaucer
-
raymond
- Posts: 47
- Joined: Thu 18 Dec, 2014 10:48 am
- Location: Cornwall
- Organisation: raymond bradshaw photography
- Interests: photography . Walking . travel .
- Contact:
Re: The driftwood look.
Here is another you tube link. https://www.youtube.com/watch?v=Q7vjiTQpNQw
Re: The driftwood look.
Interesting. 
My first thought was "Sod that for a lark".
Then I thought about it a bit and came to the conclusion, "Sod that for a lark."
My first thought was "Sod that for a lark".
Then I thought about it a bit and came to the conclusion, "Sod that for a lark."
Watch Out. There's A Humphrey About
-
raymond
- Posts: 47
- Joined: Thu 18 Dec, 2014 10:48 am
- Location: Cornwall
- Organisation: raymond bradshaw photography
- Interests: photography . Walking . travel .
- Contact:
Re: The driftwood look.
A hell of a lot of work, might be worth trying it on a small scale, just for curiosity.prospero wrote:Interesting.
My first thought was "Sod that for a lark".
Then I thought about it a bit and came to the conclusion, "Sod that for a lark."
-
gesso
- Posts: 572
- Joined: Mon 03 Dec, 2007 10:01 am
- Location: GL544DX
- Organisation: The Gilders Studio
- Interests: see above
Re: The driftwood look.
Just a word to the wise; DON'T FORGET TO LET YOUR INSURERS KNOW!gesso wrote:I've found the 'sugi ban' process allows gives you the base to then add a paint finish that will
get close to the Driftwood look.
http://thegildersstudio.co.uk
Re: The driftwood look.
I did a little time and motion study with some homemade driftwood frames.
I had two frames approx 4ftsq to do so I got some 8ft planks 90mm wide from Wickes and chop them in half. that didn't take long.
Clamped them in a workmate and attacked them with the Dremel tool I mentioned earlier. This was follwed by a good going over with a wire wheel
on a power drill.
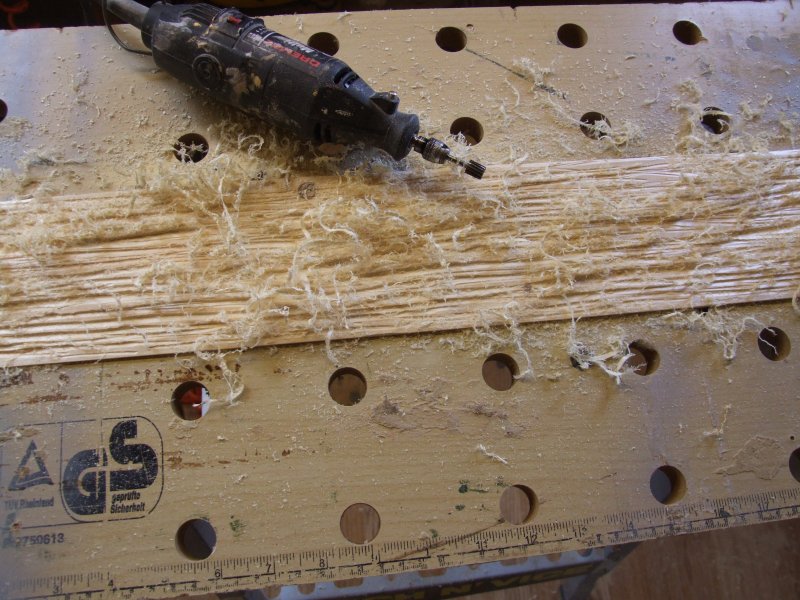
Took about an hour to carve them up. Make a nice rustic coffee table at this stage.
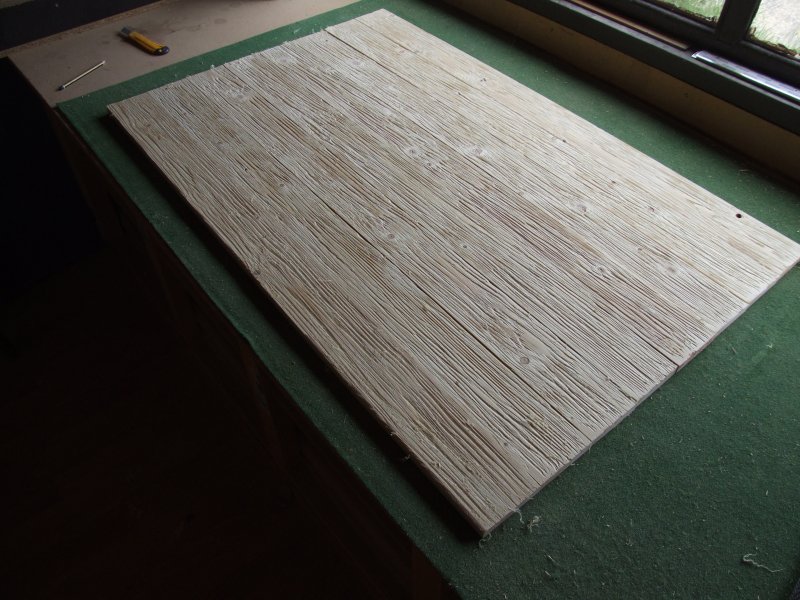
There is a hole on the far side which was a dead knot. I filled that in later.
I had two frames approx 4ftsq to do so I got some 8ft planks 90mm wide from Wickes and chop them in half. that didn't take long.
Clamped them in a workmate and attacked them with the Dremel tool I mentioned earlier. This was follwed by a good going over with a wire wheel
on a power drill.
Took about an hour to carve them up. Make a nice rustic coffee table at this stage.
There is a hole on the far side which was a dead knot. I filled that in later.
Watch Out. There's A Humphrey About
Re: The driftwood look.
What they became...
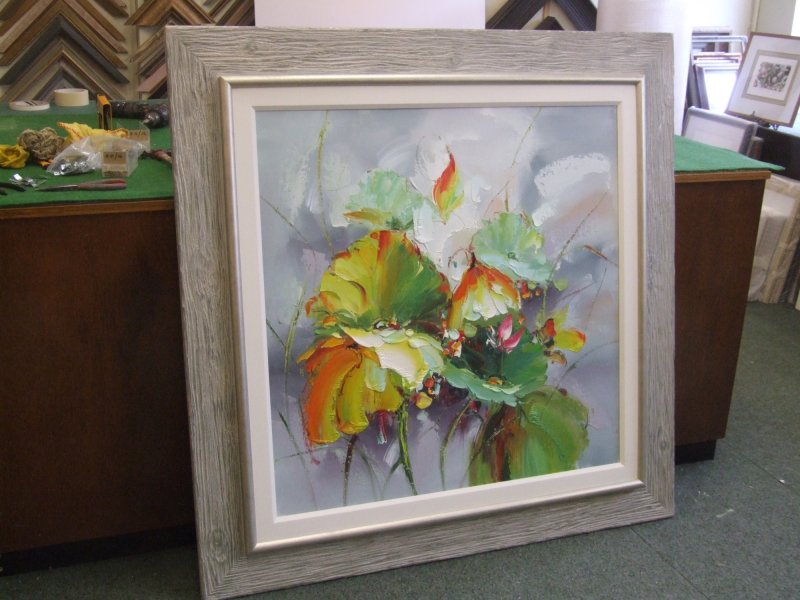
After joining the planks I added a deep hockeystick. The liner is a 2" bevel painted flat off white.
I little bit of refinement to the distressing after joining - coat of shellac - coat of light grey ripple paint. Followed by a wash of mucky browny-green. When that was dry an overall coat of silver/gold mix. then another coat of grey ripple (well diluted). when that was thoroughly dry I sanded it a bit to reveal the underlayers, going down to bare wood on a few edges. Quick waxing and finished.
I won't go into the costing in this section, but suffice it to say that if I had done it with factory moulding I would have needed to charge about 100% more and it wouldn't have been much quicker. Not that there is a factory equivalent...
Had fun too.
Watch Out. There's A Humphrey About
-
Jamesnkr
Re: The driftwood look.
All these recipes to try...
How do you secure the picture to the 2" liner? Do you lose 2" of the picture all round, or... more likely, what?
Thanks
How do you secure the picture to the 2" liner? Do you lose 2" of the picture all round, or... more likely, what?
Thanks
-
theframer
- Posts: 376
- Joined: Wed 25 Feb, 2009 7:56 pm
- Location: borehamwood
- Organisation: Icon Framers Ltd
- Interests: football,fishing
Re: The driftwood look.
Thats realy nice, how did you fit the hockey moulding to the driftwood? does the driftwood have a rebate.
Thanks
Dave
Thanks
Dave
Dave
www.iconframers.com/
www.iconframers.com/
-
Not your average framer
- Posts: 11018
- Joined: Sat 25 Mar, 2006 8:40 pm
- Location: Devon, U.K.
- Organisation: The Dartmoor Gallery
- Interests: Lost causes, saving and restoring old things, learning something every day
- Location: Glorious Devon
Re: The driftwood look.
Hi Peter,
I like that! Very nice job!
Not having done this myself, I had no idea what to expect, or what it would look like. Can I ask, do you need to have a good degree of control to get the effect to look like this, or does the dremel naturally follow the grain of the wood?
I like that! Very nice job!
Not having done this myself, I had no idea what to expect, or what it would look like. Can I ask, do you need to have a good degree of control to get the effect to look like this, or does the dremel naturally follow the grain of the wood?
Mark Lacey
“Life is short. Art long. Opportunity is fleeting. Experience treacherous. Judgement difficult.”
― Geoffrey Chaucer
“Life is short. Art long. Opportunity is fleeting. Experience treacherous. Judgement difficult.”
― Geoffrey Chaucer
Re: The driftwood look.
On pine the tool will go with the rays in the grain. You just keep stroking it lengthways. You don't really have to be too careful, quite the opposite in fact. The main thing is not to leave any patches of the original planed surface, but the final wire brushing will scuff up any remaining smooth sections.
I should have added that it looks better if you slightly scallop the outer edge. With softer woods such as Obeche you maybe have to go a bit steadier. Just realised that the bit in the Dremel was a quite dull when I did those boards. With a fresh bit it would have taken half the time. The Dremel sanding drums are also useful for this job.
The hockey stick just drops right into the outer so the backs of both are flush. Glued in with cartridge glue which also acts as a filler. Few pins though from the inside is all that's needed.
btw. There was a question raised on the Grumble this week concerning "Hand Scraped" timber. This is a phrase I had never come across. Turns out it's a technique much used on flooring to give an aged effect. Go to yooootooob and search for "hand scraped floors" or suchlike. There are some quite fascinating vids.
Watch Out. There's A Humphrey About
-
raymond
- Posts: 47
- Joined: Thu 18 Dec, 2014 10:48 am
- Location: Cornwall
- Organisation: raymond bradshaw photography
- Interests: photography . Walking . travel .
- Contact:
Re: The driftwood look.
Very hansom they look as well, amazing what can be achieved with a bit of imagination and perseverance.prospero wrote:What they became...
After joining the planks I added a deep hockeystick. The liner is a 2" bevel painted flat off white.
I little bit of refinement to the distressing after joining - coat of shellac - coat of light grey ripple paint. Followed by a wash of mucky browny-green. When that was dry an overall coat of silver/gold mix. then another coat of grey ripple (well diluted). when that was thoroughly dry I sanded it a bit to reveal the underlayers, going down to bare wood on a few edges. Quick waxing and finished.
I won't go into the costing in this section, but suffice it to say that if I had done it with factory moulding I would have needed to charge about 100% more and it wouldn't have been much quicker. Not that there is a factory equivalent...
Had fun too.