Handfinishing techniques

Discuss Picture Framing topics.

PLEASE USE THE HELP SECTION
WHEN SEEKING OR OFFERING HELP!
Not your average framer
Posts: 11008
Joined: Sat 25 Mar, 2006 8:40 pm
Location: Devon, U.K.
Organisation: The Dartmoor Gallery
Interests: Lost causes, saving and restoring old things, learning something every day
Location: Glorious Devon

Handfinishing techniques

Post by Not your average framer »

Hi,

A customer brought in a handfinished frame for re-glazing. The handfinishing was just stunning. It was produced to order about 10 years ago by a framer from London. I've included a couple of photos below in the hope that someone can tell me how this wonderful finish was produced:

Image

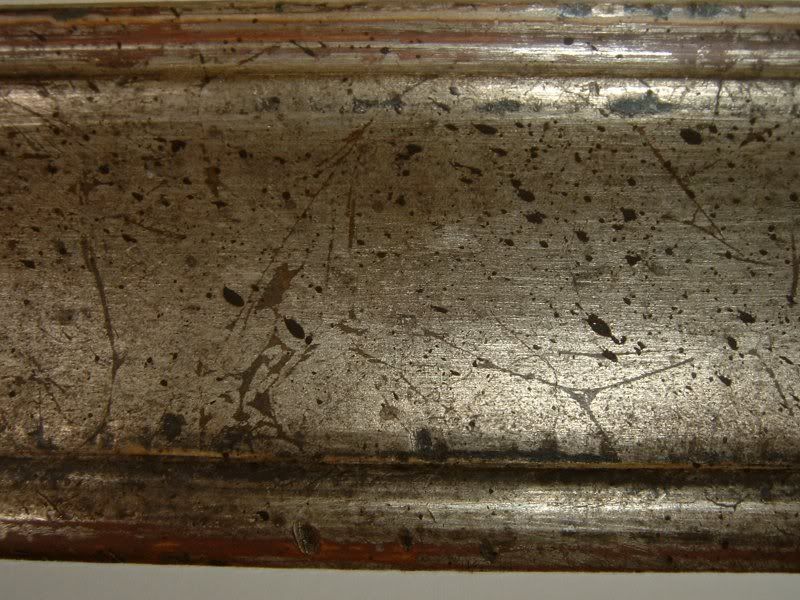
The finished result is a metallic pewter finish with various apparently randon little dark lines (which look like cracks in the paint, but are not), scratches, dents (done before applying the finish) and scrape marks. None of these effects look in any way contrived.

Image

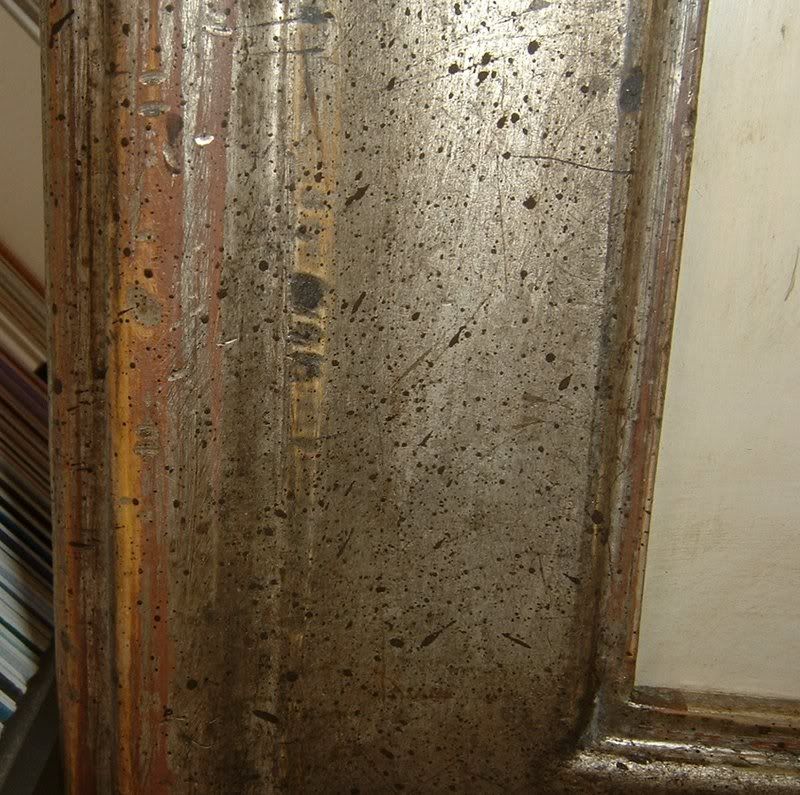
I would be grateful for any tips how such a finish may have been accomplished (especially the distressing effects) and how one can obtain the pewter paint finish - I assume that this was mixed using some other metallic colour of paint, since I am not aware of a siutable ready mixed paint off the shelf.
Thanks,
Mark
Pete.
Posts: 18
Joined: Wed 24 Jan, 2007 1:48 pm
Location: Sheffield UK

Hand Finishing Techniques.

Post by Pete. »

Looks like the work of Patrick Ireland to me, one of the Jedi Knights of hand finishing. If I were attempting this particular one, I'd start with a gessoed base of terracotta over yellow. The dints and scratches would have been done when the frame was in it's raw state. the coat of pewter colour would go on next, ( my own Everest silver and antique gold mixed would be perfect ) followed by what is obviously spattering from an oblique angle to give what appears to be be lines, ( if you look closely, you can see elongated tear-drop shapes ), then the rubbing with steel wool to get through to the gesso colours beneath. Take a long time, but worth it. Bet you've tried it before the end of the day!
Not your average framer
Posts: 11008
Joined: Sat 25 Mar, 2006 8:40 pm
Location: Devon, U.K.
Organisation: The Dartmoor Gallery
Interests: Lost causes, saving and restoring old things, learning something every day
Location: Glorious Devon

Re: Hand Finishing Techniques.

Post by Not your average framer »

Pete. wrote:Looks like the work of Patrick Ireland to me, one of the Jedi Knights of hand finishing.

Bet you've tried it before the end of the day!
Right on both counts Pete,

The customer thought the framers name was John Ireland, but he was a little vague sounding, like he wan't sure exactly. I've also briefly attempted some of the techniques and to my surprise, I've got pretty close first time.

I found I can do the dents quite easily with a bone folder. Some of the scratchy bits can be done with the milled edge of a coin, (in this case an old Candian dollar from a box of old coins I was given some time ago).

Yes, I used Terracotta and Yellow, but also some antique brown and dark red in places too. The long scratches which I thought would be difficult were a doddle with a blunt old blade from the oval 6 lighty held with just an light flick of the wrist across the surface with the blade side on the the moulding.

Will I be practicing this one Pete? I think you can guess,
All the best,
Mark
Not your average framer
Posts: 11008
Joined: Sat 25 Mar, 2006 8:40 pm
Location: Devon, U.K.
Organisation: The Dartmoor Gallery
Interests: Lost causes, saving and restoring old things, learning something every day
Location: Glorious Devon

Post by Not your average framer »

There are a few more pics of this frame on Photobucket under the name DevonFramer. All have the word hand finished in the title. I think it is an amazing piece of workmanship, the distressing of the finish is an art in it's self. I'd love to be able to watch this framer at work and see all the actions and the effects produced by each action.

I have managed to duplicate some of the techniques used on a small piece of scrap moulding, but I have little doubt that I would need much more practice and skill to achieve anything like the result on a whole frame. The skill of the man who did this is also that each part of the finished is quite different and looks like genuine wear and tear on something old, but cherished rather than battered. I'd love to be able to do work like this!
Not your average framer
Posts: 11008
Joined: Sat 25 Mar, 2006 8:40 pm
Location: Devon, U.K.
Organisation: The Dartmoor Gallery
Interests: Lost causes, saving and restoring old things, learning something every day
Location: Glorious Devon

Post by Not your average framer »

The splatter effect is the most difficult aspect of the overall effect to achieve. I've come close to it a few times, but as yet can not reproduce the effect at will.

I've tried various methods, including blowing the streaks away from the splatter spots with an air brush, but in all this I've come to the conclusion that this was done with a narrow brush with very long bristles being struck against another object to propel dropletts of paint onto the frame. Unfortunately none of my brushes seem to have the right combination of bristle length and springiness/floppiness. I'm now scrtching my head and wondering where to get the right type of brush, but I'll get there I think.

There is also an interesting under lying texture of light and dark which make it work all the better, without this the finish lacks that undefinable, but very attractive something. Boy, there's a lot goes into a finish like this. Pete, I think there is something else besides antique gold and silver in the pewter paint mix to slightly darker or dull it down, any suggestions please?
Thanks,
Mark
Not your average framer
Posts: 11008
Joined: Sat 25 Mar, 2006 8:40 pm
Location: Devon, U.K.
Organisation: The Dartmoor Gallery
Interests: Lost causes, saving and restoring old things, learning something every day
Location: Glorious Devon

Post by Not your average framer »

Deleted, Opps I quoted myself when I meant to edit
JFeig
Posts: 1406
Joined: Thu 23 Sep, 2004 8:31 pm
Location: Detroit, Michigan USA
Organisation: minoxy, LLC
Interests: non-fiction knowledge
Contact:

Post by JFeig »

paint spatter is very easy to do with an old tooth brush or a hard bristle finger nail brush.
Jerome Feig CPF®
http://www.minoxy.com
Not your average framer
Posts: 11008
Joined: Sat 25 Mar, 2006 8:40 pm
Location: Devon, U.K.
Organisation: The Dartmoor Gallery
Interests: Lost causes, saving and restoring old things, learning something every day
Location: Glorious Devon

Post by Not your average framer »

JFeig wrote:paint spatter is very easy to do with an old tooth brush or a hard bristle finger nail brush.
That's how I usually do it, but you don't get very many repeatably long thin drawn out lines unless you get really close up and then the splatter marks become much closer together and the effect is less even. I can easily do the fly speck splatter using a tooth brush, but the effect on this frame looks much more eye catching.

The frame looks far more stunning that the photos are able to convey. I do a reasonable amount of handfinishing and have seen plenty of it elsewhere, but the work on this frame just looks so classy that I just have to find out how to do it.
patrickleeland
Posts: 20
Joined: Thu 11 Jan, 2007 9:12 pm
Location: behind a slow computer

Post by patrickleeland »

That is quite a dashing finish. It is very unique. There is a company in the states that does finishes of this nature in length moulding. Roma makes some nice stuff, but I am sure this is better.

Nice looking.


PL
Not your average framer
Posts: 11008
Joined: Sat 25 Mar, 2006 8:40 pm
Location: Devon, U.K.
Organisation: The Dartmoor Gallery
Interests: Lost causes, saving and restoring old things, learning something every day
Location: Glorious Devon

Post by Not your average framer »

Yes, Patrick,

My thoughts too! I'll tell you what, it ain't at all easy to work out how to get the same results, but I'm gradually getting there. The splatter is very difficult to get just right and needs loads of practice with the technique. To date, I'm still not 100% sure which is the right technique, but I'm working on two possible methods.

The first method is a dry long bristled brush with paint only on the very tips of the bristle struck against a stationary object, but so far I'm still looking for a brush with the right characteristics.

The second method uses an air brush loaded with paint which is sprayed on to a scrap piece of glass in such a fashion as blow blobs of paint off of the edge of the glass onto the frames. This is not a new technique, but is one of the standard air brush tricks of the trade. It's not easy and takes a lot of practice to get really good at it, as there are a lot of different variables which come into play.

These are:

The distance from the air brush to the glass.
The angle of the air brush to the glass.
The distance from the glass to the frame.
The angle of the glass to the frame.
The orientation of the frame with regard to the effects of gravity.
And finally the rate of movement of the air brush as it sprays.

Unfortunately, you can really get your head round all of these variable as you are doing it, with practice it becomes kind of instinctive and I think that's the only way you can make it work.

So far I favour the air brush, but I still might change my mind as I continue to practice. There are differences in the consistency of the paint between these two techiques which affect the opacity of the resulting spatter too! I'm still to fully sort this bit out, but at least I'm beginning to understand the technical issues, hopefully the solutions will come out of this understanding. As yet I haven't fully mastered either!

The paint mixture is now solved, it is a mix of Pete's Antique Gold, Silver and an incredibly tiny touch of Antique Brown. The effect of the Antique Brown is not noticable until the paint is dry, looking to see anything while you are mixing the paint doesn't work.

I am no longer doing the dents with the bone folder, but now use a cotton bud and hit it carefully with a small hammer - absolutely the business!

When I feel ready and time permits, (I need to catch up with some more orders first), I intend doing it all for real. If it's good enough I hope to post a pic or two.
Whynot
Posts: 9
Joined: Fri 17 Feb, 2006 2:46 am
Location: Lake Aiel, PA, USA
Contact:

Post by Whynot »

Guys, sorry to disappoint you, but all you are doing is trying to paint a surface in hope it'll mimick a genuine silver leaf watter gilded one. The finish is not savant at all but it looks special to you because of your limited practice with water gilding and hand finishing. The oblique hairs that you try to paint are typical occurrences in silver leaf water gilding. Then, to an expert eye there are dents, steel wool action, splattered paint and a fine wash to be noticed on Peter The Irish's frame. That look is achievable with imitation silver leaf but the hairs will then sort of miss the peculiar triangular ends and joints seen in the first picture initially posted above.
Although many "siver" frames are in reality white gold leafed frames, those hairs can't be reproduced in white gold which is too thin and won't sustain leaf's wrinckles that are in fact responsible for that specific pattern.
Hope I'll be successful at posting two pictures in here.
Image

Image
Not your average framer
Posts: 11008
Joined: Sat 25 Mar, 2006 8:40 pm
Location: Devon, U.K.
Organisation: The Dartmoor Gallery
Interests: Lost causes, saving and restoring old things, learning something every day
Location: Glorious Devon

Post by Not your average framer »

Thanks Whynot,

What you say makes a lot of sense, but I still think this is a painted finish, because that's what it looks like, the overlaping leaf marks ARE PAINTED ON - You can see the brush strokes. I've handled this frame and seen the over-run of the paint on the reverse of the frame - IT'S PAINT, not leaf.

I've seen enough of both and they don't look the same close up. I have also examined the cracks using magnification and can easily see that they have been added on top of under lying silver finish. Have another look at the first picture I posted some of these crack lines are dark and opaque, but some are lighter and not opaque.

I took a whole memory card full of high resolution pictures of this frame which I have examined in detail. Pete Bingham taught me how to do a lot of the techniques I see on this frame and also Pete knows Patrick Ireland's work, he recognised it immediately and the customer also confirmed it. I would be interested to see what Pete says, but I would be suprised if he thought Patrick's finish was not a painted one.

In the UK we have at least two different suppliers of guilding paints which are so good in the right hands that the results can look extremely close to the real thing. These paints are in the "Everest Framing Paint" range (Pete Binghams own product) and another one called "Chrysolyte". I've only ever used the Everest paints and therefore can only tell that I've heard Chryslyte is also well spoken of. There may also be others which I don't know about.

Real leaf is always stunning in every way, but many framers like the benefits of this alternative approach which is very much quicker to do, (as the surface requires much less preparation) and this technique less expensive in terms of materials required. I have had training to do real leaf guilding myself when I used to be a bookbinder and for sheer class I know you can't beat real leaf guilding. Nothing else comes close, unfortunately very few customers are willing to pay what it costs, but many will pay the lower cost for the painted alternative.
Whynot
Posts: 9
Joined: Fri 17 Feb, 2006 2:46 am
Location: Lake Aiel, PA, USA
Contact:

Post by Whynot »

I see. Well, nothing compares to handling the object with your own hands. If that's a paint job, it fooled me. What is the solvent that attacks it?
I am a manufacturer of high end picture frames myself, and in my opinion it takes very long time and hard work to make metal leaf or paint look somewhat like genuine gold/silver leaf, if that's ever possible. It is much less expensive in the end to go with real gold than pay for huge amounts of extra qualified labor. A mid size frame of moderate complexity does require some $30+ worth of genuine gold leaf to gild and perhaps 1+ hour labor and you got the real thing in your hands to sell for better money than if you spend all that time to document, experiment and then do it on the frame, with tromp l'oeil accuracy, and sell it as if it was less worthy. But you most likely know best what your market would bear. I based my guesstimate on American cost of goods and labor. I am aware that EU cost of goods, taxes and wages can't compare to those in America, but for lack of better data...
Anyway, you kind of anticipated and answered a yet unuttered question of mine concerning the level of the British frame market sophistication and appreciation for quality frames and framing. Perhaps this topic deserves a separate discussion.
Not your average framer
Posts: 11008
Joined: Sat 25 Mar, 2006 8:40 pm
Location: Devon, U.K.
Organisation: The Dartmoor Gallery
Interests: Lost causes, saving and restoring old things, learning something every day
Location: Glorious Devon

Post by Not your average framer »

Hi Whynot,

Almost all, if not all of these paints are based on some kind of acrylic polymer. I am not aware of the differences, but the acrylic polymers used in paints can be optimised for different characteristics. There are water based and solvent based acrylic paints.

The paints which I mentioned are both water based and in their metallic varieties contain real metallic powders and can be burnished. I don't know which solvents are used with solvent based acrylic paints, but normal thinners for car body paints can sometimes be used to remove acrylics paints.

I have some of Pete Bingham's silver paint, which as far as I know is not available from Lion, (the main UK distributor), contains real silver and is quite expensive. The metallic filler in this paint is an incredibly fine powder and after burnishing looks far more like real leaf than you would expect. If out of any of these type of paints there is one which would fool you, then the silver would be high on the list of possibles. The gold paint does not contain real gold, but when mixed with the silver it starts to look pretty convincing too.

I wonder what other styles of finishing Patrick Ireland does? For all we know this may be one of his more ordinary ones and he may do things which are even more stunning. I've stopped trying to work out how to copy this one for a bit while I catch-up with orders.

I can now duplicate quite a few of the basic elements of this sort of finish, but this guy is in a very different league to me, paticularly in how he puts all these different elements together. I'm sure you will understand what I mean when I said that "It does not look contrived". The aging techniques look like the genuine thing even very close up, which is a very special ability.
Not your average framer
Posts: 11008
Joined: Sat 25 Mar, 2006 8:40 pm
Location: Devon, U.K.
Organisation: The Dartmoor Gallery
Interests: Lost causes, saving and restoring old things, learning something every day
Location: Glorious Devon

Post by Not your average framer »

Hi Whynot,

I've been going through all of my high resolution photos of this frame again. These are far higher resolution that the scaled down ones on the forum. I don't expect to get the chance of a second look at this frame again, but I'm starting to ask questions which the photos can't answer.

As I'm looking at the photos, there's one or two photos which have the old mark which perhaps looks different to what I am used to seeing. None of the photos show any overlapping leaf joints, but I didn't photograph those bits and now wish I did.

To be honest, I'm looking at the finish in the light of my own experience and you are looking at it from yours. The finish ended at the back edge on the side of the moulding, but there were paint spots and splashes on the back of the moulding which included silver, but as I think back I wish I had the frame in my hands again to have a second look.

You see I have another picture which I did not post on the web, It was not a good photo and there is something on it which could be a very small real crack in the finish and not something painted on. I feel it look a bit too crooked to be a scratched on or a splatter mark, but the photo is not sharp enough to tell me for sure.

This frame is just about the most stunning piece of work I've ever seen and in my own mind I have no difficulty in saying that this is a paint finish, particularly considering I can get fairly close to it with paints, but on the other hand I can't exactly reproduce it in spite of trying everything I can think of.

The question I am now asking myself is this "If I was in the habit of using silver leaf would I still draw the same conclusion". All I can say is one of us is right and I'm now not quite so sure which one of us it is!

BTW, Pete if you are following this, I would be interested to hear you thoughts on this.
Dermot

Post by Dermot »

If any of you have not had a look at WhyNot’s (Cornels) website http://www.american-choice.com/ you should take a few minutes to do so……all of Cornels frames are produced in his factory in Europe (Romania) at present he only sell his frames to the trade in the USA…..but I have no doubt that if some of you in the England or Ireland market were interested Cornel could be persuaded to sell into the European market…..

Cornels frames are considered by many in the upper end of the market in the US to the best product of there kind…..

Cornel is a true and passionate craft person…just a little plug for a true guardian of the picture framing industry……………I hope nobody minds….
Not your average framer
Posts: 11008
Joined: Sat 25 Mar, 2006 8:40 pm
Location: Devon, U.K.
Organisation: The Dartmoor Gallery
Interests: Lost causes, saving and restoring old things, learning something every day
Location: Glorious Devon

Post by Not your average framer »

I love the ones on the photo frames page. Really stunning work, Whynot.
Whynot
Posts: 9
Joined: Fri 17 Feb, 2006 2:46 am
Location: Lake Aiel, PA, USA
Contact:

Post by Whynot »

NYAF,

You can look at all 72 pages on my web site when using the very discrete back/next command which is to be found on the upper left corner of each page.

Hi Dermot!

As always, you are too indulgent with me and my work.
Yes, indeed, I'd like the oportunity to sell to European framers, but I am affraid this is not going to be such an easy thing mainly because of the transportation cost. It appears that cost of shipping (UPS or DHL) inside EU is about 3-4 times what it is in US when using same carriers to do absolut same job. This is the reason for which UK framers use local suppliers and never order frames made by Italian or Spanish frame-makers. Or do they?
Pete.
Posts: 18
Joined: Wed 24 Jan, 2007 1:48 pm
Location: Sheffield UK

Post by Pete. »

It's all very interesting looking at other people's hand finishing products, but at the end of the day, if you emulate them, you aren't subscribing to your own unique quality and artistry. I believe that my customers like the stuff I do because it's my own design; with perhaps an idea or two from remembered visits to the Uffizi and Hermitage et al, but essentially my own.
Lemon_Drop
Posts: 118
Joined: Wed 12 Oct, 2005 7:52 pm

Post by Lemon_Drop »

I know its a old post, but I only seen it now.

Congradulations Whynot, I just checked your website. Your frames are awesome. Your truely a master at the art of hand finished frames.

Dermot knows the American market more than anyone here and its easy to understand why those frames are considered to be the best produce of its kind there. They are works of art!

Its good to see that we have framers of your high standards here on this forum.
Post Reply