Page 1 of 1
Morso Chopper Issues
Posted: Wed 13 Mar, 2024 3:12 am
by PrintArtNZ
Hello All
I'm new to the forum and first time posting. So greetings to you all.
We run a small print and framing studio in Auckland New Zealand and need some help sorting our frame chops on our Morso guillotine.
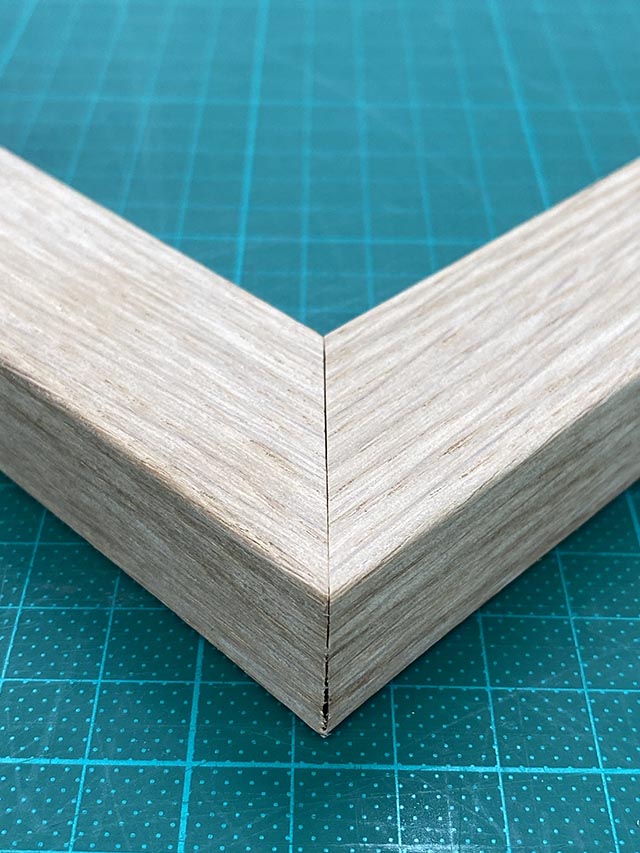
The bottom edges of the cut seem to be angled no matter what adjustments we make, even though the top join is fine.
I have replaced the blades, spent several hours "fine tuning" and everything in between... but the issue persists.
Any help and advice would be more that welcome at this stage.
Thanks.
Re: Morso Chopper Issues
Posted: Wed 13 Mar, 2024 9:58 am
by StevenG
Based on that photo my first guess would be that you've got the wedge too close to the outside edge
Re: Morso Chopper Issues
Posted: Wed 13 Mar, 2024 11:20 am
by Justintime
As Steve says, that outside wedge is far too close to the outside and is pushing the mitre open. Your outside wedge should be just past halfway no further and the inside wedge should be as close as you can to the inside.
Re: Morso Chopper Issues
Posted: Wed 13 Mar, 2024 1:26 pm
by NTG999
If you chop a square section moulding very close to the end there will remain a flat section, look to see if it is parallel. If it isn't then it's a chop problem, if it is then an assembly issue
Re: Morso Chopper Issues
Posted: Wed 13 Mar, 2024 9:12 pm
by PrintArtNZ
Hi Everyone, thanks for your comment.
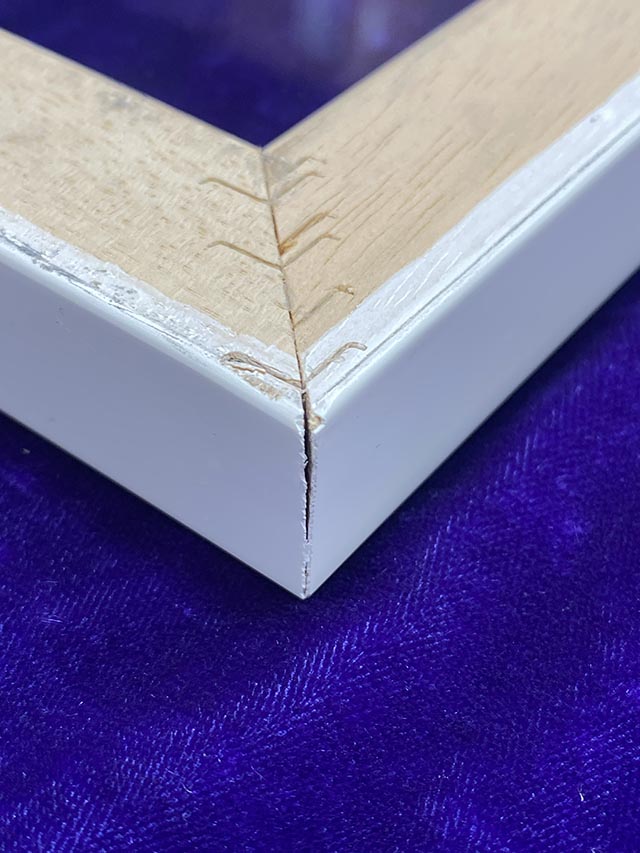
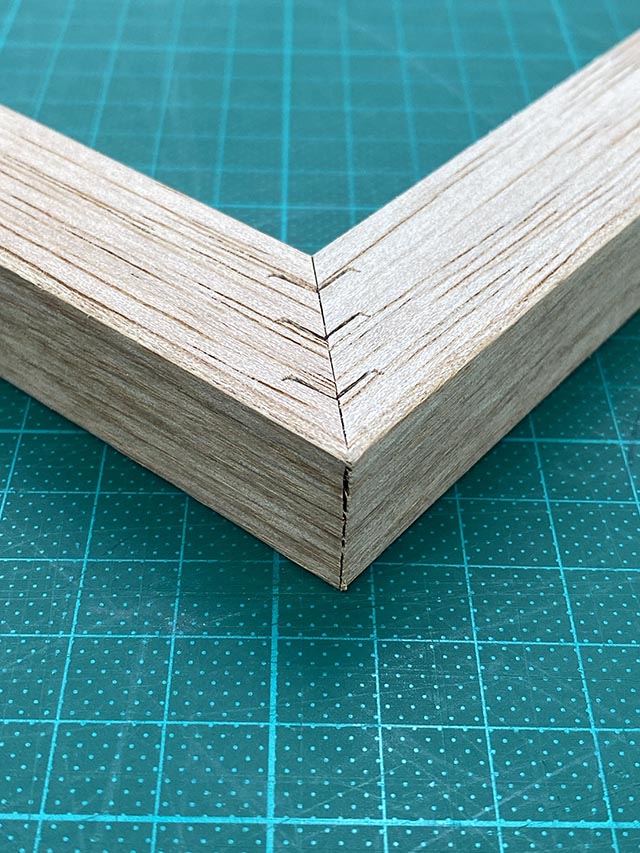
The join in the pic was un-joined and re pinned after a measuring fail ;-0. Hence the multiple nail marks.
We usually double stack three nails on these joints.
The chipping on the gesso coated mouldings is a pain in the butt... but we have little alternative with local suppliers. Suggestions welcome.
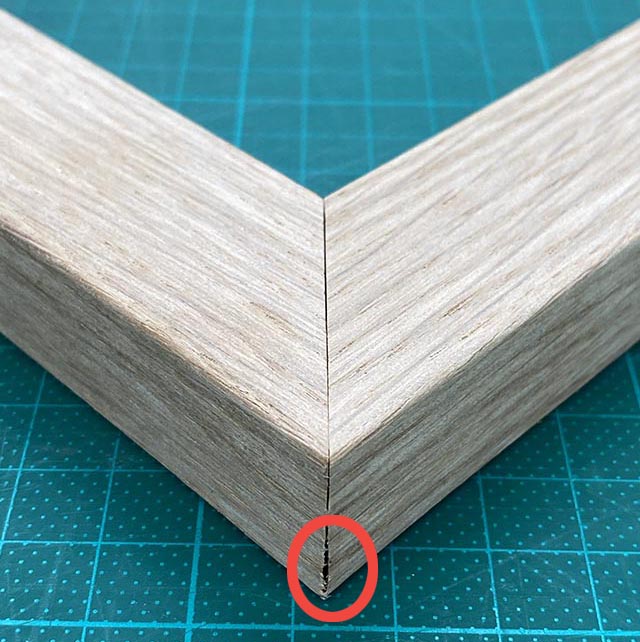
The main issue is a noticeable "nick" or on-even cut on one side of the join.
Cheers
John
Re: Morso Chopper Issues
Posted: Wed 13 Mar, 2024 9:40 pm
by Justintime
Assuming that you're gluing your joins, get a Stanley band clamp and clamp tight after joining and leave overnight. See if that improves it. Stacking can be unpredictable. I'm guessing a single 15 would do. I'd go even closer to the inside and two wedges should be sufficient. Some might agree the middle is overkill. Imho the glue and clamp is most important. The wedges hold it together if the glue fails.
Re: Morso Chopper Issues
Posted: Wed 13 Mar, 2024 11:01 pm
by StevenG
I'd also just take a quick check with the vertical fences on your underpinner too
Re: Morso Chopper Issues
Posted: Fri 15 Mar, 2024 4:45 am
by prospero
I use a lot of non-solvented cartridge glue - mainly for joining stacked plain wood sections. But it's great as a filler
and can be painted with water-based paint when dry.
Faced with that light grey moulding I would gently sand the chippy bits and then rub over with the said glue to fill
the gap. Wipe off any on the outside while it's still runny. (It dries fast). Then a quick dab with a matching mix of
acrylic paint and job done.
For the woody one do the same but use something like Brummer Stopping. Quick tickle with a sanding pad - Bingo!

Re: Morso Chopper Issues
Posted: Fri 15 Mar, 2024 10:56 pm
by PrintArtNZ
Thanks for your responses. Really appreciated.
Our joins are lightly glued before pinning. BUT we don't dry the glue first.
We use a gap filler from our framing supplier. It seems to work OK but takes ages to dry.
What should I be looking for on the vertical fence of the Morse. I've used an engineering square to check the angles and all looks good.
What really puzzles me is the weird "nick" on the one side of the chop. It's like the blade is moving during the cutting stroke, but all the guides are solid and well lubricated.
I am looking at getting a sanding disc which may sort a few of these issues, any advice advice on this would be appreciated.
Cheers
John
Re: Morso Chopper Issues
Posted: Sat 16 Mar, 2024 9:10 am
by JKX
Use glue fairly liberally, not lightly
Set up the angles of the fences with set squares etc by all means but to get things bang on, the left hand fence may need fine adjustment - use the widest flat moulding you can find and cut it upside down and tweak the fence in our out, fractionally. Make a small frame, no glue, just a couple of v nails each corner and keep breaking it up, adjusting fence and reducing its size until perfect.
Regards the back, the blades may need moving forwards slightly in to the groove between the fences, but it may also be a case of bad positioning of v nails - I think you have too many and unless you only use 7mm v nails or something, stacking shouldn’t be necessary on that profile.
You shouldn’t need any sort of trimmer or sander, and on mouldings like this, and most mouldings actually, you shouldn’t need any filler. The Morso does a great job once it’s understood.
Re: Morso Chopper Issues
Posted: Sat 16 Mar, 2024 12:08 pm
by NTG999
Hi, in your OP you mention that you have replaced the blades, is this 'I have fitted a brand new genuine pair of Morso blades' or 'I have tried another pair of blades I had to hand' ?
IMO I don't think you can easily progress these sort of issues without fitting new blades.
I have 3 sets of blades, 1 set genuine brand new and 2 sets hollow ground by one of the top recommended companies in the UK - the genuine brand new cut the most accurately....
Re: Morso Chopper Issues
Posted: Sun 17 Mar, 2024 9:38 pm
by PrintArtNZ
Hi All
The blades were replaced with a brand new genuine set of Morse set.
I have previously used a local reputable company to do the sharpening. They seem to be the go to for most framers using Morso.
I have had a go at adjusting the left fence but only using a 30mm moulding. I will have another go with a wider moulding and see if I can get it closer.
I have "padded" both fences with matte board and so the front of the blade is beyond the fence on the final cut.
Work in progress

Cheers
John